
Hands-on
Some flows may be re-used as parts of other flows. In Teneo, you can use Sub-Flows to do so. For example, requesting the user's email address can be implemented as a Sub-Flow that can then be used in larger flows. In the following, we will build both the Sub-Flow and a flow that makes use of it.
This is how a conversation should look:
User: I'd like to subscribe to your newsletter
Bot: I'm happy to add you as a recipient of our free newsletter. Please enter your email address.User: teneo@example.com
Bot: I have your email as teneo@example.com. Is that correct?User: no
Bot: Please enter your email address.User: teneo@example.com
Bot: Is your email address teneo@example.com correct? Please confirm.User: yes
Bot: OK, thank you! I'm adding your address teneo@example.com to our mailing list. You will receive a confirmation mail shortly.
We will implement the conversation in two steps:
- Build the Sub-Flow.
- Build the main flow.
Build the Sub-Flow
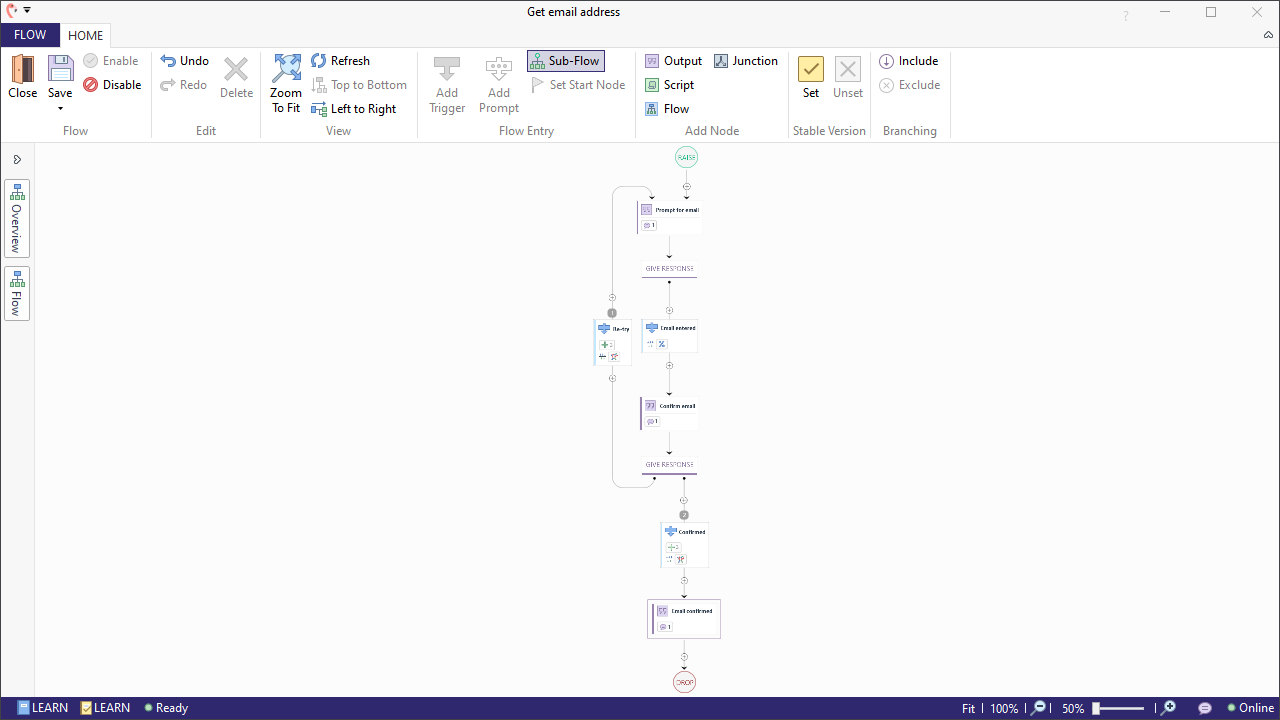
Our Sub-Flow to retrieve the user's email will ask the user to enter an email address, confirm with the user that the email was correct, and if correct, return the email. If not correct, the user will be re-prompted. This continues until a correct email was entered. The final Sub-flow will look as follows:
Create a Sub-Flow
First we will create a new Sub-Flow.
- You can create a new Sub-Flow by clicking on the dropdown menu below 'Flow' and call it
Get email address. - In the 'Flow' tab, go to 'Variables', Add a flow variable called
emailand initialize it to empty string"". - Click the arrow to return to the 'Home' tab.
Add a prompt for e-mail
- Select the output node and name it
Prompt for email. - Give it the output
Please enter your email address. - Add a new output node to follow it by clicking the Plus icon followed by 'Continue with' and 'Transaction'.
- Select the new transition and call it
Email entered. - Make sure it is set to 'Get input before continuing'.
- With the transition in the flow still marked, navigate to the Match section and a Match for 'TLML Syntax'.
- Add the Syntax Condition
%EMAIL_ADDRESS.SCRIPT^{email=_USED_WORDS}.
Set up the Sub-Flow to re-prompt
- Name the output node
Confirm emailand give it an answerI have your email as ${email}, is that correct?. - Select the 'Confirm email' output node and using the mousekey, drag and drop a transition back to the output 'Prompt for email'.
- Make sure the transition is set to 'Get input before continuing'.
- Call the transition
Re-tryand add the following examples:
example-inputs
1no
2nope
3nah
4- Finally, add a Match by clicking on the 'Generate' button to automatically generate a Match requirement based on the Intent examples specification. In this case the language object NO.PHR. This will send your flow back to the beginning if the email stored is wrong.
Set up a positive confirmation of the email
- Click on the Plus icon above the 'Re-Try' Transition, followed up with 'Split Path' and 'Transaction'.
- Select the Output node and name it
Email confirmed. - Add the following answer:
Ok, thank you! - Select the new transition and make sure it is set to 'Gets input before continuing'.
- Call the transition
Confirmedand add the following examples:example-inputs
1yeah 2yup 3yes 4 - Finally, generate a Match. Click on the 'Generate' button under the 'Match' section to automatically generate a Match requirment based on the Intent example specification. In this case the language object YES.PHR. This will let you proceed if the email stored is correct.
- Click save.
That's it! We can now use this sub-flow that requests the user's email address in as many other flows as we want. In the next section, we will show you how exactly to do that.
Build the main flow
At this point, we have a Sub-Flow that is not being used anywhere. Since it doesn't have a trigger, Teneo will never select it. In this section, we will build a flow to trigger if users request to be added to the Longberry Baristas mailing list. Later this flow will make use of the Sub-Flow 'Get email address' that we created above. But for now, we will just build the question and answer. We'll add the Sub-Flow link later.
Create the new flow
- Create a flow and name it
User wants to subscribe to the mailing list. - In the 'Flow' tab under 'Variables', add a flow variable called
emailand initialize it to empty string"". - Click the arrow to return to the home page.
- Select the trigger, call it
Subscribe to the mailing listand add the following positive Intent examples:example-inputs
1Can i get your newsletter? 2How can i subscribe to the newsletter? 3How to get on your mailing list? 4I want to subscribe to your mailing list 5I'd like to subscribe to the newsletter 6Please add me to your mailing list 7Please put me on the mailing list 8 - Click on the 'Generate' button in the Match section to automatically generate the best Match based on the example specification.
- Call the output node
Happy to add you to our mailing list. - Select the output node and add an answer
I would be happy to add you to our mailing list to receive our free newsletter..
Add a call to the Sub-Flow
Now we want to pass control to the sub-flow and let it do all the work of prompting the user for an email address.
- Click on the Plus icon below the output followed by 'Continue With' and 'Flow Link'.
- Name the transition
Call Sub-flowand make sure 'Get input before continuing' is unchecked. - Select the 'Flow' node and call it
Get email address. - With the 'Get email address' node selected, make sure the sidebar area 'Flow Link' is visible. Click 'Browse' and select our Sub-flow 'Get email address' inside the 'Flows' folder.
- Retrieve the email address from the sub-flow: in the section 'From', where you see 'Get the value back', select email from the dropdown list.
Finish the flow
- Select the Plus icon below the 'Flow' node and add a new output node by hovering over 'Continue With', followed by 'Transaction Element Output'.
- Name the transition
Return from Sub-flowand make sure 'Get input before continuing' is unchecked. - Call the output node
Confirmation. - Lastly, give the output an answer
I'm adding your address ${email} to our mailing list. You should receive a confirmation mail shortly.. - Hit 'Save'.
That's it! You may now give it a go in Tryout and replicate the conversation below. Note that the answer parts from the sub-flow are italic for illustrative purposes. In practice, they will not be distinguishable from the answers of the main flow:
User: I want to subscribe to your newsletter!
Bot: I'm happy to add you to receive our completely free newsletter. Please enter your email address.User: teneo@example.com
Bot: I have your email as teneo@example.com, is that correct?User: Yes.
Bot: OK, thank you! I'm adding your address teneo@example.com to our mailing list. You should receive a confirmation mail shortly.