
Class Manager
Introduction
The Class Manager allows to built an Intent Classifier directly in Teneo Studio by adding classes, training data and - optionally - test data; read more about Intent Classification in Teneo here.
Create
Edit
To edit an existing class:
- Double-click the class name in the Class list, or
- Select the class and click Edit in the top ribbon
- Now, perform any needed updates:
- Edit the name in the Class Name field
- Write training examples in the Enter Training Example text field
- When done, click Add or press Enter to add the example to the list and write a new one
- Repeat above steps to introduce the all wanted training data examples
- Select the Test Examples tab to add Test Data Examples
- Write test examples in the Enter Test Example test field
- When done, click Add or press Enter to add the example to the list and write a new one
- Repeat above steps to introduce all the wanted test data examples
- Remember to click Save to preserve any modifications.
TIP In edit-mode, drag/drop examples between the Training Examples tab and the Test Examples tab to move examples from one tab to the other; multi-select by pressing Ctrl while clicking and drag/drop multiple examples in one
The top ribbon of the Class Manager also provides a number of buttons and options, these are described further in the below table.
Class Manager: top ribbon (Home tab)


The Class Manager's top ribbon provide a range of buttons and options for working with classes, the below table lists the different buttons and, when relevant, links to more information are provided.
| Section | Button | Comment | More info |
|---|---|---|---|
| Class Manager | Close | Close the Class Manager | Close |
| Save Classes | Save modifications performed in one or more classes; clicking the lower part of the button allows to save with or without comment | Save | |
| Import Classes | Import various classes from a .tsv file | Import classes | |
| Classes | Add Class | Add a new class | Create |
| Edit | Edit the selected class | ||
| Delete | Delete the selected class | Delete | |
| Filter Classes | Text field; use to filter on the list of classes | Filter | |
| Examples | Examples Filter | Text field; use to filter on the lists of training and test data examples | Filter |
| History | Class | Open the history of the selected class | History |
| Stable Version | Set/Unset | Set the current version of the selected class(es) as stable or unset it | Version flag |
| Branching | Include/Exclude | Include or Exclude the selected class(es) from branching when working in a Localization setup | Localization setup |
Class tab
The backstage of the Class Manager (Class tab in the top of the Class Manager window) contains the below mentioned menu items.
| Menu item | Comment |
|---|---|
| Save Classes | Save all classes |
| Close | Close the Class Manager window |
Generate
Save
Close
Delete
Filter
Search
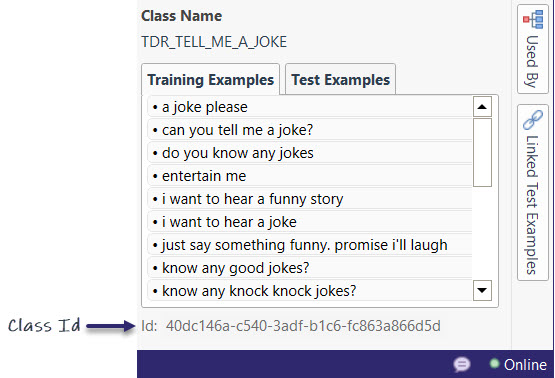
The information related to a class, such as the name, Id, training data examples and test data examples, is searchable in the Search tab of the main Teneo Studio window.
The Id of a class is available at the bottom of the Class details in the Class Manager when selecting the class (in read-only mode). To copy the Id, simply right-click it and select copy from the context menu.

For more information, please visit the Search section.
Import Classes
The Import Classes button, in the top ribbon of the Class Manager, allows to import classes from an external file (in .tsv format); requirements related to the file are explained below.
To import a .tsv file, follow the below steps:
- In the Class Manager, click Import Classes
- Browse to the location of the .tsv file, select it and click Open
Alternatively drag/drop the .tsv file onto the Class list - Teneo Studio prompts to confirm the data import, click Yes
- Remember to click Save in the Class Manager to preserve the modifications.
Note that the import functionality does not check if the .tsv file contains duplicated data examples; this check is performed by the Class Manager when saving and the user will have to remove any duplicated examples from the Class Manager before being able to save the newly imported classes; also see Save further above.
File Requirements
As of Teneo 7.3 it is possible to import classes with both training data examples and test data examples.
The old format, specifying class name and training data example only, is still supported while a new format is available supporting data type, class name as well as test and training data examples.
Below please find further details for the new and old formats.
To update an existing class, the class name must be written in upper case in the .tsv file
The new format allows to:
- create new class(es) with training data examples only
- create new class(es) with training data examples and test data examples
- update existing class(es) with test data examples and/or training data examples.
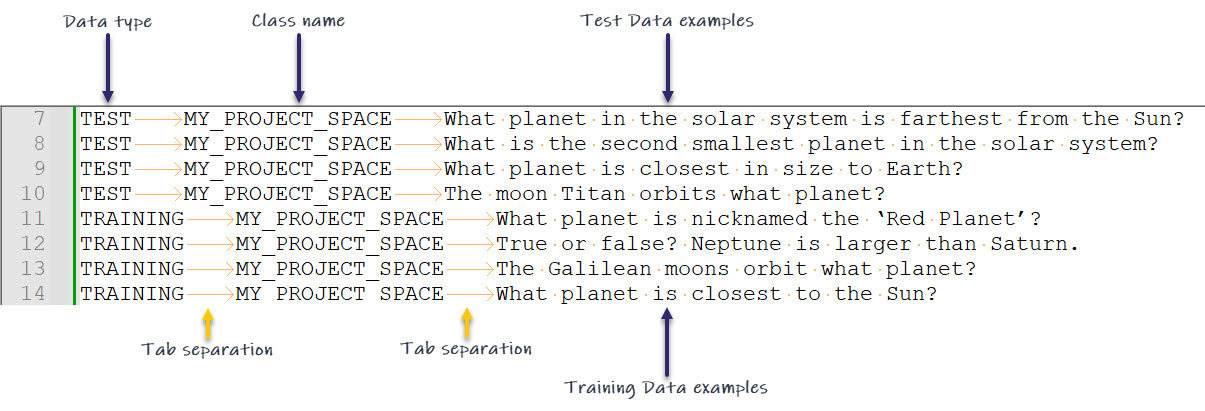
The requirements of the file to import are as follows:
- plain text file, saved in the tab-separated values format (.tsv)
- one line per training or test data example
- each line must contain three columns separated by tab with the following information:
- the data type: either TRAINING or TEST, note that data type must be written in upper case
- a valid class name, and
- depending on the specified data type, either a training or a test data example.

Details
Class Name Requirements
The requirements for the class names are:
- the class name must be unique
- the class name must be upper case
- the class name cannot contain reserved characters nor spaces
Teneo Studio automatically suggests a new class the name CLASS, this should be customized by the user.
If the user adds more classes (without customizing the names), Teneo Studio adds an incremental number to the suggested names of the next classes, for example, CLASS, CLASS_1, CLASS_2, CLASS_3, etc.
If the Class Name field is left empty, the user will not be able to save modifications until a name is provided.
Class Name As Annotation
At runtime, Teneo Predict uses the names of the classes to create the annotations for the most probable intent class(es) and denotes the annotation with a confidence score. The name of the annotation is the same as the name of a class in the Class Manager.
Therefore, the class name is visible in any place where annotations are usually seen, for example, in Tryout or scripting, and because of this users are encouraged to give each class a unique and easily recognizable class name.
As the class names are applied within the Teneo Platform as annotations, these can also be used within TLML syntaxes using the Teneo Linguistic Modeling Language.
Training Data
To train an intent model more than one class must exist and, for optimal performance, it is recommended to provide a minimum of ten unique training data examples per class. It is compulsory to add at least one training data example to each class.
Identical training data examples are not allowed and to avoid duplicated training examples, the Class Manager prevents developers from saving if two identical examples are detected in the same class. Saving is also prevented if an empty example is detected.
In Teneo Studio Desktop, when adding training examples manually, the Class Manager also prevents developers from adding a new example to the list if the exact same example already exists.
Keep an eye to the Suggestions in the backstage of Teneo Studio Desktop as duplicated examples detected in the same class or different classes are raised here
Note that to perform a Cross Validation evaluation in the Class Performance area of Teneo Studio Desktop, each class must contain a minimum of 5 training examples.
Test Data
Test Data can be added to classes just like training data, but where the training data is used to train the intent model, the test data is only used to evaluate the intent model when running Test Data Evaluation in the Class Performance area of Teneo Studio Desktop. And, therefore, it is not compulsory to add test data examples. Test data can be defined in a solution on triggers, transitions and classes.
Similarly to the training examples, the test examples must be unique. To avoid duplicated test examples, the Class Manager prevents developers from saving if two identical examples are detected.
In Teneo Studio Desktop, when adding test examples manually, the Class Manager prevents developers from adding a new example to the list if the exact same example already exists.
Furthermore, the Class Manager, in Teneo Studio Desktop, displays Linked Test Examples for the classes. The linked test examples come from triggers and transitions which reference the selected class (as a Class Match) and cover the positive User Intent examples added to the trigger or transition in the Flow. These linked test examples cannot be edited in the Class Manager, but direct navigation is possible by double-clicking. Note that User Intent examples from triggers and transitions in disabled flows are ignored and not displayed as linked test examples.
During a Test Data Evaluation, the model is evaluated with all the test data examples added directly to the class together with the linked test examples. Duplicated test examples are removed from the test data when running Test Data Evaluations.