
Bulk Import
The Bulk Import feature of Teneo Studio allows users to create Language Objects, Entities and Question and Answer (Q&A) pairs outside Teneo Studio in a csv file and later import these into the solution.
This page describes the process of bulk import from within Teneo Studio; to read more about the file format and setup please see bulk import formats
Execute a bulk import
To execute a bulk import follow the below steps:
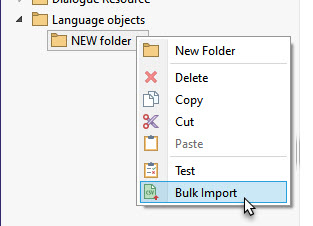
- In the Solution Explorer, select the folder for the documents to import
- Click Bulk Import in the top ribbon of Teneo Studio
- Now, browse to the location of the csv file and click Open


Alternatively, it is possible to execute the bulk import by right-clicking the selected folder and choose Bulk Import from the context menu.

Dragging/dropping a csv file onto the Solution Explorer also allows to execute a bulk import; dragging/dropping to a folder saves the documents in the selected folder
Validation
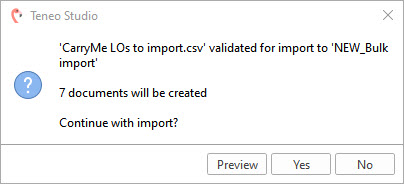
Teneo Studio performs a validation of the csv file to import; when the validation is done, a pop-up window prompts the user to select between the following options:
- Click Preview to visualize an example of one of the documents to import
- Continue with the import by clicking Yes, or
- Cancel the import by clicking No

Teneo Studio starts the file import and displays a progress bar; click Run in Background to keep working in Teneo Studio while the import takes place.
Successful bulk import
When the import has finished, Teneo Studio informs the user about the bulk import results displaying a confirmation of the completed import.

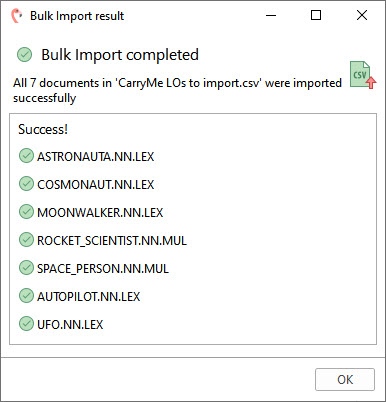
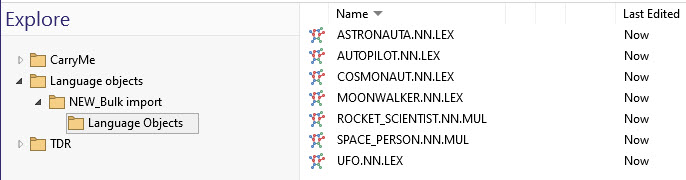
The newly created documents now appears in the folder(s) in Teneo Studio.

TIP: if both Language Objects, Entities and Q&A pairs are to be imported, it might be a good idea to first import the Language Objects/Entities, as this way these documents can be used as, for example, TLML Syntax Matches of Flow triggers and transitions
Troubleshooting
Validation check
Teneo Studio performs a series of checks to validate the format and setup of the csv file to be imported. If the validation fails, the import is cancelled and an error message displayed informing the user about the issues encountered in the file (find more information in the next section).
The validation process verifies only the format of the csv file and that the mandatory fields and tags are added correctly. It does not check any other aspects, such as TLML Syntax, and therefore it is recommended to always check the syntax of Language Objects or Matches after an import has finished.
Warnings and errors
As mentioned in the above section, when the validation of the csv file fails, an error message is displayed.


By hovering over any of the errors, more information related to the error is displayed to the user indicating in which part of the csv file the error was detected.

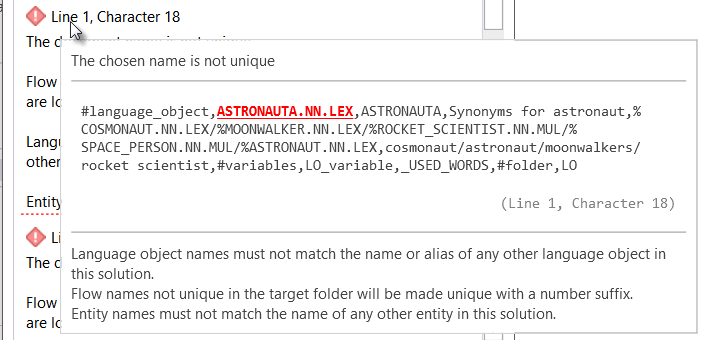
Duplicate names
When performing a bulk import of Language Objects or Entities, Teneo Studio does not accept a file containing duplicates, i.e. several Language Objects with the same name or alias, nor will it accept a file containing Language Object/Entity names or aliases already present in the solution.
When performing a bulk import of Q&A pairs, if a Flow name is not unique within a folder, Teneo Studio will rename the imported Q&A pair's name by adding a number to the end of the name.