
Salesforce
The Salesforce example solution showcases how to connect a Teneo solution with the Salesforce REST api. The example flows in the solution demonstrate how accounts can be retrieved as well as how to retrieve, create, update or delete cases in Salesforce.

Solution contents
Salesforce integration
The solution contains a Salesforce backend integration containing methods for authentication, retrieval of accounts and cases as well as for creating, editing and deleting cases. Since the source code of the integration is embedded in the solution, it can be easily extended or used as a starting point for new methods.
Example flows
For each core method in the Salesforce integration, the solution contains a corresponding example flow:
- Show accounts
- Show cases
- Create a case
- Delete a case
- Update a case
- Get info on a case
Authentication subflows
Salesforce provides various OAuth Authentication Flows that allow a Teneo bot to interact with Salesforce on the user's behalf. Which authentication flow to use depends on factors like use case and channel. This example solution contains subflows to demonstrate two authentication approaches.
Example conversation
User: Create a case
Bot: Against which account would you like to book the case? The first three account names are: Burlington Textiles Corp of America, Dickenson plc, Edge Communications.
User: EdgeBot: Thanks. Can you give me a short description of the problem?
User: Usage guidelines for flux capacitor missingBot: Is the priority low, medium or high?
User: highBot: Your case has been created.
User: show my cases
Bot: Total open cases found: 2. The case numbers are: 00001016, 00001032.User: Give more details about case 00001032
Bot: Here is the information for case 00001032 || Subject: Usage guidelines for flux capacitor missing || Status: New || Priority: HighUser: Delete it
Bot: Are you sure you want to delete case 00001032?
User: YesBot: Your case has been deleted.
Getting started
Prerequisites
- These instructions assume you have a Salesforce admin account. Alternatively, you can signup for a free developer account on developer.salesforce.com.
- These instructions assume you have downloaded and imported the Salesforce solution. See instructions below.
Create a Salesforce connected app
- Using your administrator account, log in to your Salesforce organization.
- In the top right, click on 'Setup' icon (cog) and choose Setup.
- In the menu on the left under 'Platform Tools' choose 'Apps' > 'App Manager'
- In the 'Lightning Experience App Manager' page, click 'New Connected App'.
- In the Basic Information section:
- Enter meaningful names in the Connected App Name and API Name boxes.
- Enter your email in the Contact Email box so that you can receive messages from this application.
- In the 'API (Enable OAuth Settings)' section:
- Select the 'Enable OAuth Settings' check box.
- In the 'Callback URL' box, enter a dummy but valid secured URL such as
https://login.salesforce.com/services/oauth2/callback. - In the 'Available OAuth Scopes' list, select the following items:
- Access your basic information (id, profile, email, address, phone)
- Full access (full)
and click 'Add' for each so that they appear in the 'Selected OAuth Scopes' list.
- Click 'Save' and then click 'Continue'.
In the page that appears for your new connected app, in the 'API (Enable OAuth Settings)' section:
- Copy the 'Consumer Key' value and save it in a text file, you will need it later.
- Next to 'Consumer Secret', click 'Click to reveal', copy the value that appears and save it in a text file, you will need it later.
Create a Salesforce profile
By default, this solution authenticates using Salesforce's OAuth 2.0 Username-Password Flow, mostly because it is easiest and quickest to get started during development.
The solution can use a Salesforce administrator account to access your Salesforce content. It is however a better practice to create dedicated Salesforce user, profile, and permission set, that specify minimal permissions and access.
To create a new user profile in Salesforce, proceed as follows:
- In the menu on the left under 'Administration' choose 'Users' > 'Profiles'.
- In the 'Profiles' page, click 'New Profile'.
- In the Clone Profile page:
- In the 'Existing Profile' box, select an existing profile such as 'Standard User' to be used as a template for the new profile according to the permissions you want to grant to the Teneo user.
- In the 'Profile Name' box, enter a name such as
TeneoConnector.
- Click 'Save'.
Set permissions
In the new profile that appears, click the 'Edit' button, and make sure that the following options are selected:
- Under 'Connected App Access' check the checkbox for the connected app you created earlier
- Under 'Administrative Permissions' make sure the checkboxes are checked for:
- API Enabled
- Edit Read Only Fields
- Modify all data (this will automatically select some other checkboxes)
Save the changes by clicking the 'Save' button.
Create a Salesforce user
Next, create a Salesforce user dedicated to the Teneo Salesforce connector:
- In the menu on the left under 'Administration' choose 'Users' > 'Users'.
- In the 'All Users' page, click 'New User'.
- In the 'New User' page:
- Fill the required fields.
- In the 'User License' box, select Salesforce.
- In the 'Profile' box, select the profile you just created.
- Click 'Save'.
- An email will be sent to the user for verification. Complete the verification process. Make sure you remember the username and password, you will need it later.
Obtain a securityToken
- Log in to Salesforce as the user you created above.
- Click the avatar in the upper right corner and in the menu that appears choose 'Settings'.
- Choose 'Reset My Security Token' from the menu on the left in the 'My Personal Details' section.
- Click the 'Reset Security Token' button. The token will be emailed to the email address of the user.
- Copy the token from your email and save it in a text file, you will need it below.
Add credentials to your solution
The solution contains a global variable salesforceCredentials in which various credentials we have collected should be stored. The value of the global variable should be a map structured like this:
[
'username':'salesforce.user@email.com',
'password':'salesforce user password',
'securityToken':'salesforce user security token',
'consumerKey':'connected app consumer key',
'consumerSecret':'connected app consumer secret'
]
To update the global variable, proceed as follows:
- In a text editor, update the map above by pasting in the values you have collected in the steps above.
- In you Salesforce solution, click the 'Solution' tab and select 'Globals' in the purple navigation bar.
- Select the 'Variables' tab at the top, select the variable called,
salesforceCredentials. - In the panel on the right, click 'Edit'. You can now update the value of the variable by pasting the updated map.
- When done, click 'Save' in the top right corner.
Test in tryout
Your solution is now ready. You can test this in tryout by asking 'Display accounts'. The answer should provide the names of the first three accounts.
More on authentication
Salesforce offers multiple OAuth Authentication Flows that developers can use to allow their users to authenticate with Salesforce. Which authentication flow to use depends on the type of application and the use case.
This Salesforce solution contains a subflow called Salesforce OAuth2 authorization. This subflow is included at the beginning of each flow that needs to access Salesforce data. The subflow checks if the global variable salesforceAuthObj contains an authentication object with the tokens needed to perform API requests. If the salesforceAuthObj variable is empty, the subflow calls another subflow to authenticate the user.
By default, the Salesforce OAuth2 authorization subflow links to the subflow Authenticate using stored credentials to authenticate the user. This subflow uses Salesforce's OAuth 2.0 Username-Password Flow and the instructions in the getting started section on this page explain how to prepare your solution using this authentication approach.
The Authenticate using stored credentials subflow uses the credentials stored in the global variable salesforceCredentials to authenticate with Salesforce and it receives the following details from Salesforce in return (values shortened for brevity):
{
    "access_token": "00D3X00000...s0WYt5J171Y",
    "instance_url": "https://eu29.salesforce.com",
    "id": "https://login.salesforce.com/id/00D3X000002KGroAAA/0053X00000AaQwTBBB",
    "token_type": "Bearer",
    "issued_at": "157374093769",
    "signature": "bWeqDPCLG...SHzfojg="
}
This object is then stored in the global variable salesforceAuthObj, so it can be used for subsequent requests that require authentication. The global variable is used by the Salesforce integration for the various REST requests.
The solution uses the stored credentials approach by default, mostly because it is easiest and quickest to get started. However, because this authentication flow passes the user’s credentials back and forth it is advised to use this authentication method for development purposes only. Additionally, using stored credentials means that all objects created by the bot are created by the same user. Therefore, it might be preferred to implement an authentication flow that enables Teneo to interact with Salesforce on the user's behalf.
Using web server authentication
To enable Teneo to interact with Salesforce on the user's behalf, this solution contains an additional example subflow called Authenticate using web server authentication. This subflow can be used for Salesforce's OAuth 2.0 Web Server Authentication Flow.
The Authenticate using web server authentication flow assumes no user credentials are stored in the solution (it ignores the salesforceCredentials global variable). Instead, this subflow tells the client application or channel connector that authentication is required and it expects to receive the relevant access tokens in return. This means, using this authentication flow will require developers to add Salesforce authentication code to the client application or connector (for example by using JSforce, a JavaScript Library utilizing Salesforce's API).
When authentication is required, the subflow will return an output containing an output parameter sfAuth with the value true. This tells the client application or channel connector that an Access Token needs to to be obtained. The subflow expects the next input to contain a parameter salesforceAuthObj with a JSON object containing the following details:
| Key | Description |
|---|---|
| id | The user info url |
| access_token | The access token provided by Salesforce |
| instance_url | The instance url provided by Salesforce |
An example (values shortened for brevity) looks like this:
{
    "id": "https://login.salesforce.com/id/00D3X000002PWroUAG/0066X00000AaCwTAQV",
    "access_token": "00D3X000002KGr...2s0WYt5J171Y",
    "instance_url": "https://eu29.salesforce.com"
}
Once Teneo receives the input with the salesforceAuthObj, it will be stored in a global variable so it can be re-used for subsequent requests without asking the user to authenticate again. The global variable is used by the Salesforce integration for the various REST requests.
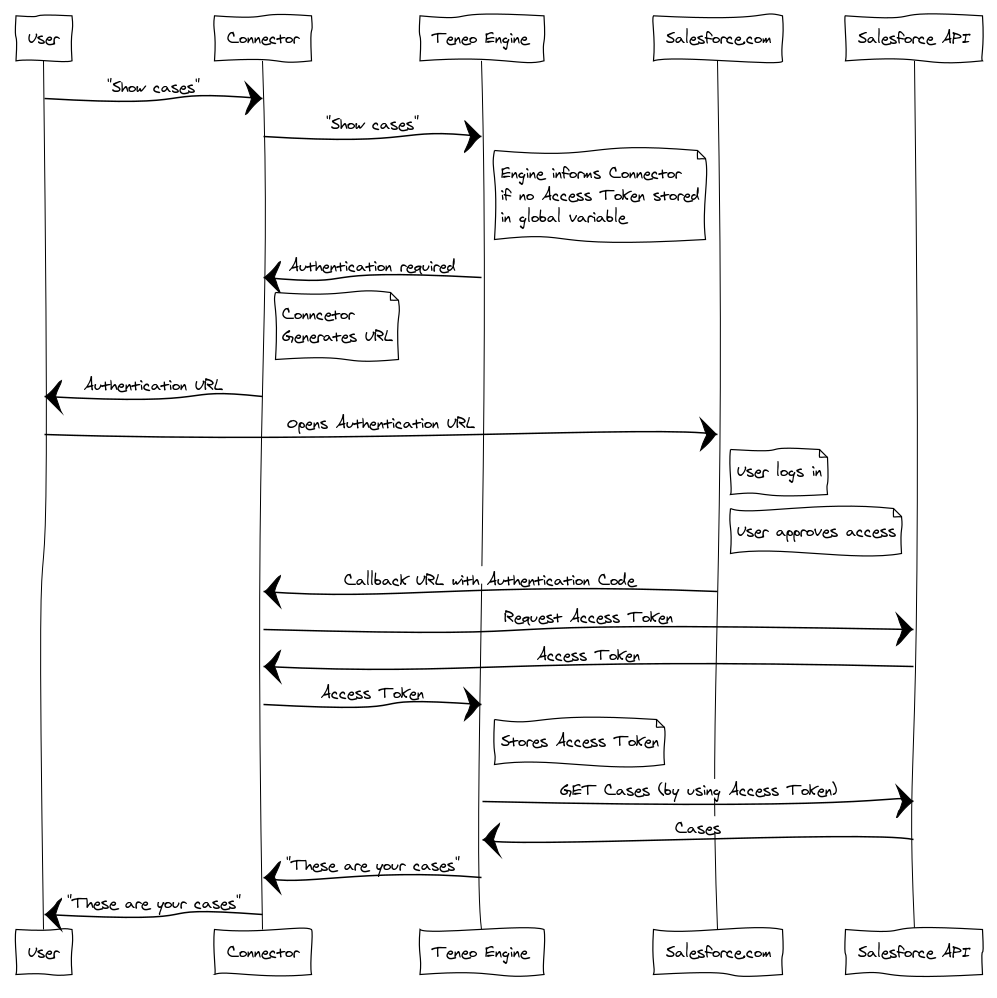
The authentication flow for the web server authentication in combination with Teneo roughly looks like this:
For more details on Salesforce and OAuth, see: Digging Deeper into OAuth 2.0 in Salesforce
To change your solution to switch to web server authentication, follow these steps:
- Go to the Subflows folder and open the Salesforce OAuth2 authorization subflow in edit mode.
- In the flow diagram, select the node called Link to appropriate authentication subflow.
- In the 'Flow link' panel on the right, click 'Browse...'.
- Browse to the 'Subflows' folder, select the subflow called Authenticate using web server authentication and click 'OK'.
- Click 'Save' in the top left corner.
That's it. Your solution now assumes web server authentication is supported by the client application or connector.
Download
- Download the solution here.
- Import the solution into Teneo. For more details see: How to import solutions.
- Once imported, please make sure to assign the Lexical Resources called 'Teneo Lexical Resource English'.