
Getting started
Now that you have created a solution for your bot, it's time to add your first dialogue. In Teneo, all dialogues are designed as flows. Flows contain the logic needed to resolve a specific question of the user. They can be simple (e.g. a flow that answers the question "What kind of coffee do you have?") or complex (for example, a flow that helps the user order a coffee beverage), but they always represent some kind of pre-defined conversational pattern.
Throughout these pages, we will create a bot for Longberry Baristas, a very hip (yet fictitious) coffee bar. We will start with a simple flow to handle the following conversation:
User: What kind of coffee do you have?
Bot: We offer a variety of handcrafted coffee drinks - from espressos to macchiatos to flat whites and more.
To achieve this we will do the following:
- Create a folder in which we can store our flow.
- Add a new flow.
- Provide example inputs to recognize the user's intent.
- Generate a Match based on the provided example inputs.
- Add an answer text.
- Save and test our flow.
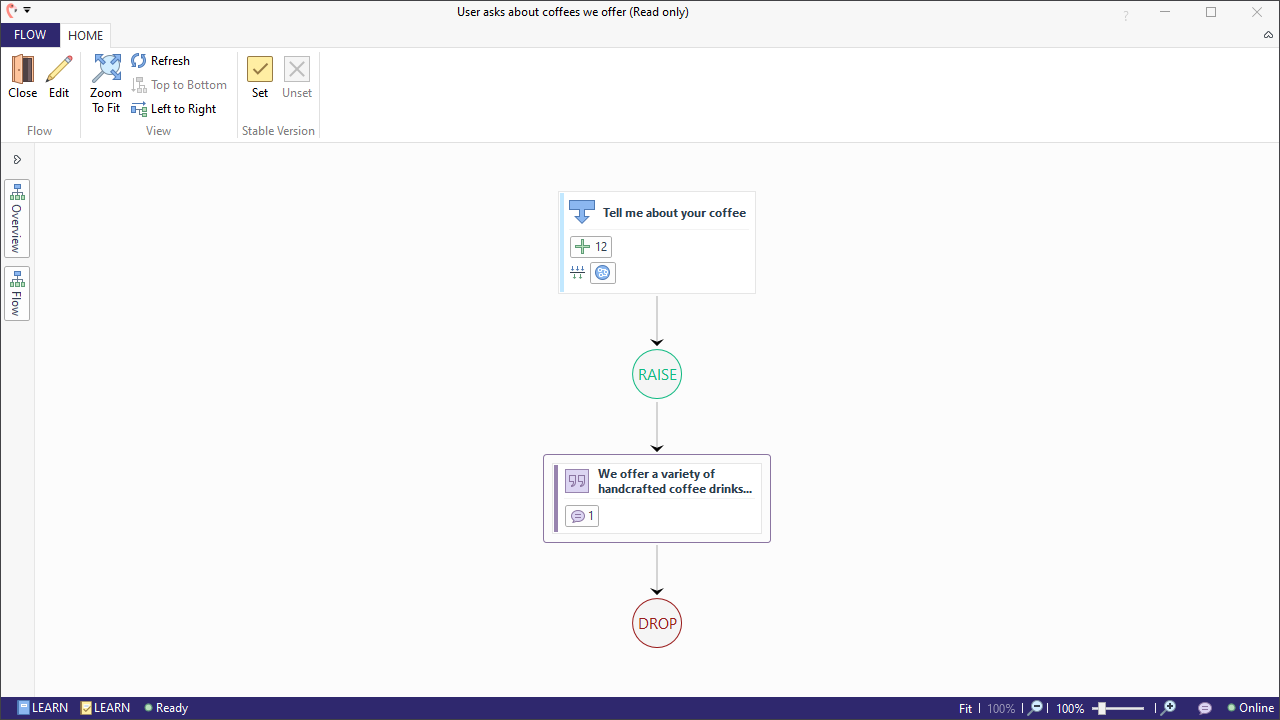
The result will look like this:
Before you continue, make sure you are logged in to Studio and have opened the solution you created earlier.
Create a 'Flows' folder
Flows are stored in folders. In the 'Explore' section, you will see several folders with flows that came out of the box. These flows make sure your bot will understand and respond to greetings, meta-requests (e.g. 'Can you repeat that?'), feedback (e.g. 'You are great'), and conversational small talk (e.g. 'How are you?'). Since you are the owner of this solution, you can change the answers in these flows if you wish.
We will store our flows in a separate folder, so let's create that first.
- Make sure no existing folder is selected by clicking on your Solution root folder.
- Click the 'Folder' icon in the 'New' group located on the Ribbon bar.
- Give your folder a name, such as
Flows, and hit Enter.
Create your first flow
Now that we have a folder in which we can store our work, we can create our first flow:
- Select the folder in which you want to store your flow.
- Click the 'Flow' button in the 'New' group in the Ribbon. A new window will open (the flow window).
- Enter the name of the flow in the Name field, e.g.
User asks about coffees we offer. - Click on the left-pointing arrow in the top left corner of the window. This takes you to the main flow page.
As you can see, flows are represented graphically in Teneo. Simple flows just contain a trigger that recognizes the user's intent (the blue box labeled Trigger) and an output that contains the bot's answer (the purple box labeled Output). More complex flows contain more elements like multiple triggers, scripts, different outputs, etc. We're going to start with a simple flow, so you will only need to populate the trigger and the output that you see in the flow graph.
Populate the trigger
Triggers are used to recognize inputs from the user that express a similar intent. In this trigger, we want to capture and understand the user's intent around which coffee Longberry Baristas serve. It is important to recognize that there can be several ways of expressing the same intent. For example, 'What coffee do you sell?' or 'Which coffees do you serve?'. To make the trigger match on user input, we need to add a Match requirement. This Match is essentially a criterion that needs to be met for an input to be matched.
- Select the trigger to open the trigger configuration panel.
- Give the trigger a name like:
Tell me about your coffeeby selecting 'Add name' on top of the trigger configuration panel. - In the User Intent section, enter this example in the 'Enter an Example' field:
What kind of coffee do you have?, then hit the 'plus' icon beside it or hit Enter. Alternatively, paste it straight into the Positive Intents section.
Now, you can repeat the step above to add more examples one by one, but you can also paste multiple examples in one go:
- Copy the examples below:
example-inputs
1Do you have brewed coffee
2Do you serve macchiato
3Do you have cappuccino
4Tell me about the coffees you have
5Tell me about your coffee
6What coffee do you serve?
7What kinds of coffees do you serve?
8What kinds of drinks do you sell
9Which coffees are offered by Longberry Baristas?
10Which drinks do you have?
11Which sorts of coffees do you have
12- Next, right-click the empty area in the learning example area and paste the inputs (alternatively, you can click the tab labeled 'Positive' and hit Ctrl+V to paste them).
- Finally, add a Match. Click on the 'Generate' button under the 'Match' section. This will automatically generate a Match based on the example specification.
When you generate a new Class Match, the Class gets generated based on the training data that you assigned for the User Intent. Once the Class is generated, it gets added to the overall machine learning model of your solution. However, if you want to expand your Class with additional training data, you have to do so in the class manager. You will learn more about the class manager on a later page.
Add an answer text
Next, we will need to set the bot's answer in the flow. There are many options to define the bot's response. For now, we will focus on the answer text only.
- Select the purple box marked Output (the Output node) to open the output configuration panel.
- Give the output a name like:
We offer a variety of handcrafted coffee drinks... - In the text box paste in the following:
We offer a variety of handcrafted coffee drinks - from espressos to macchiatos to flat whites and more.
Save your flow
Now that we have added everything needed to our first flow, it's time to save it:
- Click 'Save' in the top left or use the shortcut Ctrl+S.
- In the popup that appears you can leave a short description that will appear in the flow's version history, then click 'Continue'.
Done! Congratulations! You have created your first flow.
Test your flow
Now it's time to test your work inside Teneo Studio.
- Minimize or close the flow you just created.
- If the Tryout panel is not visible, make it appear by clicking the 'Tryout' button on the right side of the window.
- In this case, you can test your flow by trying out the following examples:
What kind of coffee do you have?Which drinks do you serve?
As you can see, both inputs will trigger your flow. Teneo not only recognizes the exact learning examples you entered but also different variations that express a similar intent.
Summary
You have just created your first flow, so you have already seen a few important concepts in Teneo:
- Flows, which contain the logic to resolve a specific question of the user.
- Folders, where you can store your flows and language objects.
- Triggers, to recognize the user input or intent.
- Match, to set a criterion that the user input must match.
- Outputs, to provide the bot's response.
- Tryout, which you use to test your flows.
Test yourself
Try adding another flow where the user can ask which coffee sizes are available at Longberry Baristas. The bot should return the three available sizes: small, medium, and large.